Recent Posts
How Restoration Professionals Assess Structural Water Damage: Expert Insights from SERVPRO®
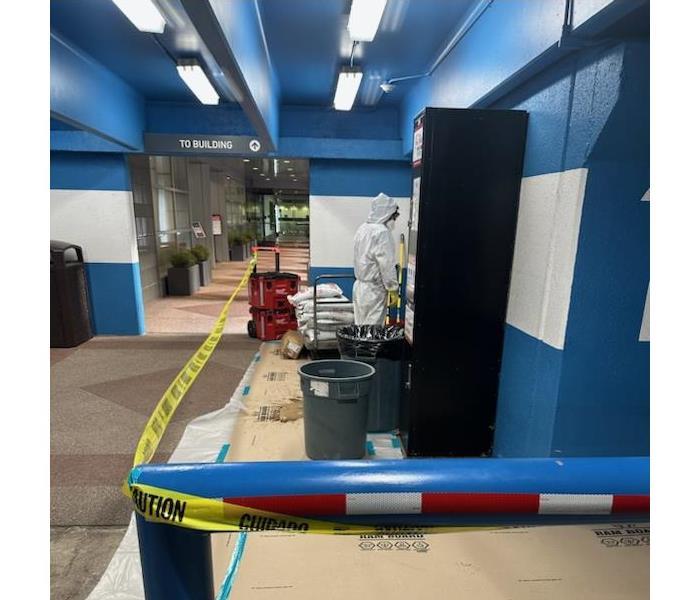
3/12/2025 (Permalink)
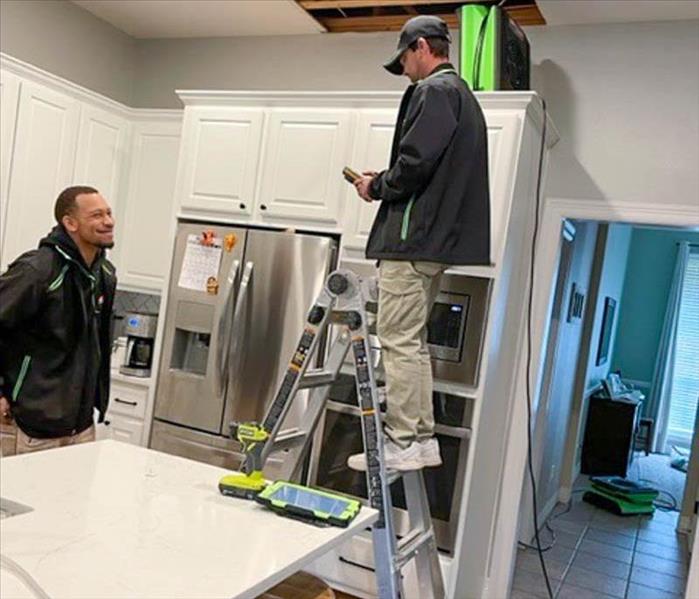
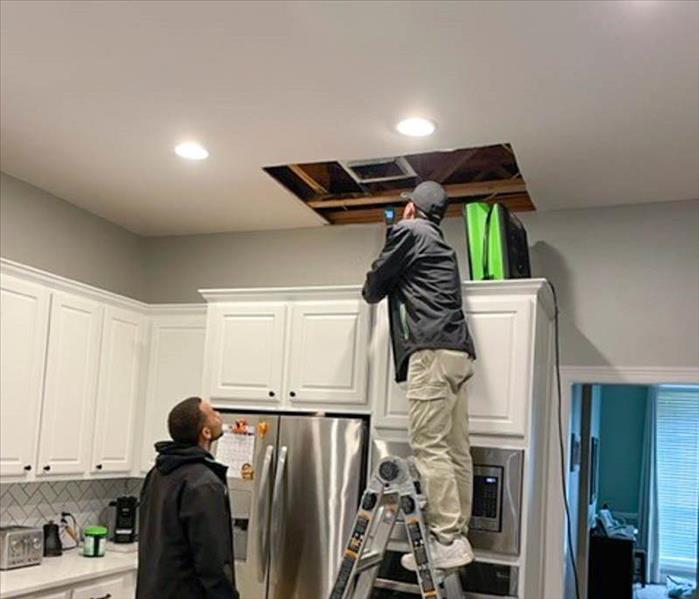 Water damage can be devastating to homes and businesses in Taylor, TX, affecting not only visible surfaces but also the underlying structure.
Water damage can be devastating to homes and businesses in Taylor, TX, affecting not only visible surfaces but also the underlying structure. When water infiltrates a building, it can weaken essential materials such as wood, drywall, and concrete, leading to costly repairs if not properly addressed. This is where professional restoration experts, like SERVPRO®, step in.
Assessing structural water damage requires specialized knowledge, tools, and techniques to determine the extent of the damage and develop an effective restoration plan. In this blog, we’ll break down the process of how restoration professionals assess structural water damage, helping you understand what to expect when disaster strikes.
Why Is a Professional Water Damage Assessment Important?
Not all water damage is visible to the naked eye. Even if water appears to have dried on the surface, moisture can remain trapped within walls, floors, and ceilings, leading to long-term structural issues. A professional assessment ensures:
- Accurate Damage Detection – Professionals use specialized tools to detect hidden moisture that could cause future damage.
- Proper Restoration Planning – Identifying the extent of the damage allows for targeted and efficient repairs, reducing unnecessary costs.
- Prevention of Further Structural Issues – Addressing water damage early can prevent long-term problems such as material deterioration and weakened support structures.
With a professional assessment, property owners can have peace of mind knowing that no hidden damage is left untreated.
How Restoration Professionals Assess Structural Water Damage
Restoration professionals follow a systematic approach to evaluate water damage, using advanced techniques and tools to ensure accuracy. Here’s what the assessment process typically involves:
1. Initial Inspection and Damage Documentation
Upon arrival, restoration professionals conduct a thorough visual inspection of the affected areas. This includes:
- Identifying water stains, warping, or discoloration on walls, ceilings, and floors.
- Checking for swollen or softened drywall and flooring materials.
- Looking for structural shifts or separations in building materials.
- Documenting visible damage with photographs and detailed notes for insurance purposes.
2. Moisture Mapping and Advanced Detection Techniques
Since water can spread beyond visible areas, professionals use advanced tools to detect hidden moisture, including:
- Moisture Meters – Measure the moisture content in walls, floors, and structural materials to identify damp areas.
- Thermal Imaging Cameras – Detect temperature differences in materials, revealing moisture pockets not visible.
- Hygrometers – Measure humidity levels to assess how much moisture remains in the air and materials.
By mapping out moisture levels, experts can determine the full scope of the damage and develop a precise drying plan.
3. Determining the Category and Class of Water Damage
Not all water damage is the same. Restoration professionals categorize water damage to determine the proper cleanup approach:
- Category 1: Clean water from sources like broken pipes or rainwater.
- Category 2: Gray water with some contaminants, such as dishwasher or washing machine leaks.
- Category 3: Black water containing hazardous materials, such as floodwater or sewage backups.
Additionally, water damage is classified based on the extent of saturation:
- Class 1: Minimal absorption, affecting only part of a room.
- Class 2: Water is absorbed into walls and carpets but remains mostly on surfaces.
- Class 3: Water has soaked walls, ceilings, and flooring extensively.
- Class 4: Specialized materials like concrete, brick, or hardwood require advanced drying methods.
This classification helps professionals determine the best course of action for drying and restoration.
4. Structural Integrity Assessment
A crucial part of the assessment is determining if the building’s structural components have been compromised. Restoration experts check:
- Wood framing for warping, splitting, or softening.
- Drywall for swelling, sagging, or disintegration.
- Flooring for buckling, separation, or sinking areas.
- Ceilings for signs of water pooling or weight-bearing concerns.
If significant structural weakening is detected, repairs or reinforcements may be necessary before proceeding with drying and restoration.
5. Developing a Customized Drying and Restoration Plan
Based on the assessment, restoration professionals create a tailored drying plan, which may include:
- Industrial-strength dehumidifiers to remove excess moisture from the air.
- High-powered air movers to accelerate drying.
- Specialty drying techniques for hardwood floors, drywall, and other affected materials.
- Structural repairs or replacements for severely damaged components.
This plan ensures that all affected areas are properly restored, preventing further damage down the line.
Frequently Asked Questions (FAQs)
Q: How long does a water damage assessment take?
A: The time required depends on the extent of the damage. A basic assessment may take an hour, while a more detailed inspection with moisture mapping can take several hours.
Q: Can I assess water damage on my own?
A: While you can spot visible signs of water damage, hidden moisture often requires specialized tools for accurate detection. Professional assessments ensure that no damage is overlooked.
Q: How soon should I call for a water damage assessment?
A: As soon as possible. The longer water sits, the more damage it can cause. Immediate assessment helps prevent further structural deterioration and costly repairs.
Q: Will insurance cover the cost of a professional water damage assessment?
A: In many cases, yes. If the water damage is due to a covered event (such as a burst pipe or storm damage), insurance may cover both the assessment and restoration costs. It’s best to check with your insurance provider.
Q: What happens if structural damage is found?
A: If structural issues are detected, SERVPRO restoration professionals will recommend necessary repairs, which may include replacing compromised materials or reinforcing weakened structures.
Final Thoughts
A professional water damage assessment is the first critical step in restoring a property after water intrusion. Restoration experts use advanced tools and proven techniques to detect hidden moisture, evaluate structural integrity, and develop an effective drying and repair plan.
At SERVPRO, we specialize in comprehensive water damage assessments and restoration services, ensuring that no damage goes unnoticed. If your home or business has experienced water damage, contact SERVPRO today for expert evaluation and restoration solutions.
By acting quickly and relying on professional expertise, you can protect your property from long-term structural issues and costly repairs.
The Importance of Deodorization in Fire Damage Restoration: Expert Insights from SERVPRO
12/18/2024 (Permalink)
 Dive into the importance of deodorization in fire damage restoration.
When a fire strikes, the immediate priority is to extinguish the flames and prevent further property damage. However, after the smoke clears, another significant challenge arises: lingering odors. Fire damage goes beyond visible destruction, leaving behind unpleasant and persistent smells caused by smoke, soot, and burned materials. This is where deodorization plays a critical role in the fire damage restoration process.
Deodorization is essential for fully restoring a property after a fire, ensuring that the space is not only visually repaired but also free of any residual odors. In this blog, we will dive into the importance of deodorization in fire damage restoration and how SERVPRO® uses expert techniques to eliminate odors effectively.
What Causes Odors After a Fire?
After a fire, odors can be caused by a variety of factors, including:
- Burnt materials: When materials like wood, plastic, or fabrics burn, they release strong, unpleasant odors.
- Smoke: Smoke particles can permeate porous surfaces like walls, furniture, and carpets, leaving behind stubborn odors.
- Soot: Soot is a byproduct of incomplete combustion, and it clings to surfaces, contributing to lingering smells.
Even after the debris has been cleared and surfaces cleaned, odors from smoke and soot can persist, making deodorization a necessary part of fire damage restoration.
Why Is Deodorization Important in Fire Damage Restoration?
1. Eliminating Lingering Smoke Odors
One of the most persistent effects of a fire is the smell of smoke, which can cling to everything from walls to clothing. Smoke particles are microscopic and can penetrate deep into porous materials, making them difficult to remove through traditional cleaning methods alone. Without proper deodorization, the smell of smoke can linger in a building for weeks or even months after a fire.
According to the National Fire Protection Association (NFPA), there were 356,500 home structure fires in the United States in 2020, leading to significant damage to both property and air quality. Deodorization is crucial for restoring not only the appearance of a building but also its indoor air quality.
2. Restoring Comfort and Usability
After a fire, it’s not just about cleaning up the visible damage—it's also about making the space livable again. Lingering odors from soot and smoke can make a home or business uncomfortable to occupy. For businesses, this can mean lost revenue if customers or employees are unable to tolerate the residual smell. For homeowners, it can mean delays in returning to normal life.
Effective deodorization ensures that the space is fully restored and comfortable to live or work in, preventing prolonged displacement and enabling a return to normal operations.
3. Preventing Recontamination of Cleaned Areas
Even after surfaces have been cleaned of visible soot and debris, odors can recontaminate these areas if the underlying odor source is not addressed. Smoke particles that have permeated walls, ceilings, or furniture can release odors back into the air, undermining the restoration efforts.
Proper deodorization ensures that both the air and affected surfaces are treated, preventing odors from returning and keeping the restored space clean and odor-free.
Expert Deodorization Techniques Used by SERVPRO
SERVPRO uses advanced deodorization techniques to remove stubborn odors caused by fire damage. Here’s a breakdown of some of the most effective methods:
1. Thermal Fogging
Thermal fogging involves using a fogging machine that heats a deodorizing agent to create a fine mist. This mist penetrates deep into porous materials, neutralizing smoke particles and eliminating odors at their source. This process is highly effective for reaching areas that may be difficult to clean manually.
2. Ozone Treatment
Ozone treatment uses ozone gas to break down odor-causing particles in the air. Ozone (O3) is a powerful oxidizing agent that neutralizes odors at the molecular level. It’s particularly effective for treating large spaces or areas where smoke has infiltrated HVAC systems and air ducts.
3. Hydroxyl Generators
Hydroxyl generators are another tool in the deodorization process. These machines create hydroxyl radicals, which are natural air purifiers that neutralize odors without the need to evacuate the building. This method is safe for use in occupied spaces and is effective for ongoing deodorization during the restoration process.
4. Odor Absorbing Sponges and Charcoal Filters
For smaller or more localized areas, SERVPRO technicians use odor-absorbing sponges and charcoal filters to remove odors from surfaces and the air. These tools help trap and eliminate odor particles without introducing additional chemicals into the environment.
How SERVPRO Ensures Comprehensive Deodorization
At SERVPRO, we understand that fire damage restoration goes beyond removing visible signs of damage. Our team of experts conducts a thorough assessment of the property, identifying all areas affected by smoke and soot. We then implement a comprehensive deodorization plan, using the most advanced tools and techniques to ensure that your property is free of lingering odors.
Final Thoughts: The Essential Role of Deodorization in Fire Damage Restoration
Deodorization is an essential part of fire damage restoration, ensuring that your property is not only visually restored but also free of unpleasant odors. With expert techniques like thermal fogging, ozone treatment, and odor-absorbing sponges, SERVPRO guarantees a full restoration that addresses both the physical damage and the lingering effects of fire.
Don’t let stubborn odors make your home or business uncomfortable after a fire. Contact SERVPRO today to learn more about our fire damage restoration and deodorization services. Our team is ready to help restore your property and get you back to normal quickly and efficiently.
How to Clean Up Small Amounts of Mold in Your House: Expert Tips from SERVPRO®
11/13/2024 (Permalink)
 In this blog, we’ll walk you through expert insights on how to clean up small amounts of mold in your house.
Mold is an unwelcome guest in any home in Taylor, TX, often developing in damp, dark areas. While mold can grow quickly and cause long-term damage to your property, small amounts of mold can often be managed and cleaned by homeowners with the right techniques. Tackling minor mold issues early can save you time, money, and stress in the long run. In this blog, we’ll walk you through expert insights on how to clean up small amounts of mold in your house.
According to the Environmental Protection Agency (EPA), if the moldy area is less than 10 square feet, homeowners can typically handle the cleanup on their own.
What Causes Mold Growth in Homes?
Mold thrives in environments where there is moisture, warmth, and organic material. The most common areas for mold growth include bathrooms, kitchens, basements, and anywhere water damage has occurred. Leaky pipes, high humidity, and poor ventilation can all contribute to mold growth.
Tools and Materials You’ll Need for Mold Cleanup
Before starting any mold cleanup project, it’s essential to have the proper tools and materials. Here’s a list of supplies you’ll need to effectively clean small mold spots:
- Protective gloves and goggles: Mold spores can be easily spread, so protect yourself with gloves and eye protection.
- N95 mask: This will help prevent inhaling mold spores.
- Scrub brush or sponge: For scrubbing the mold off surfaces.
- Detergent or mold cleaner: You can use a commercial mold cleaner or a simple mixture of detergent and water.
- White vinegar or hydrogen peroxide: Both are effective natural cleaners for mold.
- Microfiber cloths or disposable wipes: For wiping down surfaces.
- Trash bags: To dispose of contaminated materials after cleaning.
Step-by-Step Guide to Cleaning Small Mold Spots
1. Identify the Mold-Affected Area
Before you begin, identify the size and location of the mold growth. If the affected area is larger than 10 square feet, it’s best to call a professional mold remediation service like SERVPRO to handle the issue. However, if the area is smaller, you can proceed with cleaning.
2. Protect the Area and Yourself
It’s important to minimize the spread of mold spores. Close off the room you’re working in to prevent spores from traveling to other areas of the house. Use plastic sheeting to cover doorways and vents. Make sure you’re wearing protective gear like gloves, goggles, and an N95 mask before you start the cleaning process.
3. Prepare Your Cleaning Solution
For small mold spots, a basic cleaning solution can do the trick. A combination of detergent and water is often sufficient for cleaning hard surfaces like tile or glass. Alternatively, you can use white vinegar or hydrogen peroxide. Vinegar is an excellent natural mold cleaner, and it’s safe for most surfaces.
- Vinegar solution: Pour undiluted white vinegar into a spray bottle and apply it directly to the mold.
- Hydrogen peroxide solution: Use a 3% hydrogen peroxide solution in a spray bottle. Spray it directly onto the mold and let it sit for 10 minutes.
4. Scrub the Moldy Surface
Once you’ve sprayed the mold with your cleaning solution, use a scrub brush or sponge to clean the area. Be sure to scrub thoroughly, removing all visible mold from the surface. For stubborn mold spots, you may need to reapply your cleaning solution and scrub again.
5. Wipe Down and Dry the Area
After scrubbing, use a microfiber cloth or disposable wipes to clean off the mold residue. Make sure the surface is thoroughly dried, as moisture can encourage mold to return. Consider using a fan or dehumidifier to help dry the area faster, especially in high-humidity locations like bathrooms or basements.
6. Dispose of Contaminated Materials
After cleaning, safely dispose of any materials that may have come into contact with mold, such as the scrub brush, cloths, or wipes. Seal them in a trash bag to avoid spreading mold spores and remove them from your home immediately.
7. Inspect the Area Regularly
Once you’ve cleaned up the mold, it’s important to keep an eye on the area to ensure that the mold doesn’t return. Regularly inspect for signs of moisture or mold growth. If you notice mold reappearing, it may indicate an underlying moisture issue that needs to be addressed.
Tips for Preventing Mold Growth
To avoid recurring mold issues, follow these expert tips for mold prevention:
- Control humidity levels: Keep indoor humidity levels below 60% by using dehumidifiers or exhaust fans, especially in bathrooms, kitchens, and basements.
- Fix leaks promptly: Whether it’s a leaky roof, window, or plumbing, fix water leaks as soon as possible to prevent mold from taking hold.
- Improve ventilation: Proper ventilation is key to reducing moisture buildup. Use fans in high-moisture areas and ensure your home is well-ventilated.
- Clean and dry after water exposure: If any part of your home gets wet (from a spill, leak, or flood), make sure it’s cleaned and dried within 24 to 48 hours to prevent mold from developing.
When to Call SERVPRO for Mold Remediation
While small mold cleanups can be handled by homeowners, larger mold infestations require professional remediation. If you notice extensive mold growth or continue to experience moisture issues in your home, contact SERVPRO for expert mold remediation services. Our trained professionals will thoroughly assess the mold issue, address the underlying cause, and ensure that your home is restored to a safe, mold-free condition.
Conclusion
Cleaning up small amounts of mold in your house can be manageable with the right tools and techniques. By following these steps and preventing future mold growth, you can maintain a clean, mold-free home. However, if the mold issue grows beyond your control, SERVPRO is Here to Help® with professional mold remediation services. Don’t hesitate to reach out to us for expert assistance in keeping your home safe and mold-free!
Preventing Sewage Backups: What Homeowners Need to Know
10/16/2024 (Permalink)
Sewage backups are one of the most unpleasant and potentially dangerous problems a homeowner can face. They not only create a messy situation but also pose serious risks and can lead to expensive repairs. Knowing the common causes of sewage backups and how to prevent them can save you a lot of stress and expense. Let’s explore the primary reasons why sewage backups occur and what you can do to avoid them.
1. Blockages in the Sewer Line
One of the most common reasons for sewage backups is a blockage in the main sewer line. These blockages can happen due to the buildup of grease, debris, or items that shouldn’t be flushed down the toilet. Over time, these materials can accumulate and eventually block the flow of wastewater, causing it to back up into your home.
How to Avoid It:
To prevent blockages, avoid pouring grease down the drain and be mindful of what you flush. Items like wipes, paper towels, and feminine hygiene products should never be flushed because they don’t break down like toilet paper. Regularly inspecting and cleaning your sewer lines can also help keep them clear.
2. Tree Root Intrusion
Tree roots are naturally drawn to moisture, and sewer lines are a perfect target. Roots can grow into the pipes, causing cracks and blockages. As they continue to grow, they can eventually block the entire sewer line, leading to a backup.
How to Avoid It:
To reduce the risk of tree root intrusion, avoid planting trees and shrubs near your sewer lines. If you already have trees close to your sewer line, consider having the roots regularly trimmed by a professional. In some cases, it might be necessary to replace older sewer lines with newer, more durable materials that are less susceptible to root intrusion.
3. Heavy Rainfall and Flooding
Heavy rains and flooding are common in Texas and can overwhelm the sewer system, leading to backups. When the municipal sewer system becomes overloaded, it can cause wastewater to flow back into homes through drains and toilets.
How to Avoid It:
While you can’t control the weather, you can take steps to protect your home from backups caused by heavy rain. Installing a backwater valve is an effective way to prevent sewage from flowing back into your home. Additionally, making sure your property’s drainage system is well-maintained can help manage excess water during storms.
4. Aging Sewer Systems
Older homes in Taylor, TX, may have outdated sewer systems that are more prone to issues like blockages, cracks, and collapses. As sewer systems age, they become less efficient and more susceptible to backups.
How to Avoid It:
If you live in an older home, it’s important to have your sewer system inspected regularly. Consider upgrading to modern materials like PVC pipes, which are more durable and less likely to fail. Regular maintenance and timely repairs can extend the life of your sewer system and help prevent backups.
5. Combined Sewer Systems
In some areas, the municipal sewer system is a combined system that handles both sewage and stormwater. During periods of heavy rainfall, these systems can become overwhelmed, leading to backups in homes.
How to Avoid It:
If your home is connected to a combined sewer system, consider installing a sump pump and backwater valve to help manage excess water. These devices can prevent sewage from backing up into your home during heavy rain.
The Importance of Professional Maintenance
Regular maintenance is key to preventing sewage backups. Having your sewer lines inspected and cleaned by professionals can help identify potential issues before they become major problems. If you do experience a sewage backup, it’s crucial to contact a professional restoration company like SERVPRO of Taylor, Elgin to handle the cleanup safely and effectively.
Essential Guide to Emergency Preparedness: Creating a Storm Survival Kit
9/11/2024 (Permalink)
 We walk you through the essential components of a storm survival kit and highlight the importance of emergency preparedness.
In the face of increasing storm severity in Taylor, Texas, being prepared is more crucial than ever. Having a well-equipped storm survival kit can make all the difference in ensuring the safety and well-being of you and your loved ones during and after a severe storm. In this guide, we will walk you through the essential components of a storm survival kit and highlight the importance of emergency preparedness.
The Importance of a Storm Survival Kit
A storm survival kit provides essential supplies to sustain you during and after a storm. It includes items that help meet basic needs, such as food, water, and medical supplies. According to a survey by the Federal Emergency Management Agency (FEMA), only 39% of Americans have developed an emergency plan and survival kit. This statistic underscores the need for greater awareness and preparedness.
Essential Components of a Storm Survival Kit
Water and Food
Ensure you have at least a three-day supply of water, with one gallon per person per day. Include non-perishable food items such as canned goods, protein bars, and dried fruits. Don’t forget a manual can opener!
First Aid Kit
A comprehensive first aid kit is crucial. Include bandages, antiseptics, pain relievers, prescription medications, and any specific medical supplies needed by family members.
Tools and Supplies
Include a flashlight with extra batteries, a multi-tool, duct tape, and plastic sheeting. These items can help make temporary repairs and navigate in the dark.
Clothing and Bedding
Pack extra clothing, sturdy shoes, and blankets. Consider the weather and include items like rain gear and thermal blankets to stay warm and dry.
Personal Hygiene Items
Include personal hygiene items such as soap, hand sanitizer, toothbrushes, and feminine hygiene products. These items help maintain cleanliness and prevent infections.
Important Documents
Store copies of important documents in a waterproof container. This includes identification, insurance policies, medical records, and bank information.
Communication Devices
A battery-powered or hand-crank radio can keep you informed about weather updates and emergency instructions. Additionally, include a portable phone charger to maintain communication.
Customizing Your Kit
Special Needs
Consider the specific needs of all family members, including infants, the elderly, and pets. Pack baby supplies, pet food, and any special medications or equipment.
Updating Your Kit
Regularly check and update your kit. Replace expired food, water, and medications, and adjust the contents as necessary based on seasonal changes and family needs.
Conclusion
Creating a storm survival kit is a fundamental aspect of emergency preparedness. By assembling the essential components and customizing the kit to your family's needs, you can ensure that you are ready to face severe storms with confidence. Remember, preparation is key to survival and recovery. For expert assistance with storm damage restoration, contact SERVPRO® for professional and reliable services. Stay safe and be prepared!
The Vital Importance of Securing Your Property After a Fire
8/14/2024 (Permalink)
 This blog will explore why securing your property post-fire is essential and provide practical steps to take.
Experiencing a fire in your Taylor, TX, home is devastating, and while the immediate danger might pass once the flames are extinguished, the aftermath presents its own set of challenges. Securing your property after a fire is crucial for protecting your home, belongings, and personal safety. This blog will explore why securing your property post-fire is essential and provide practical steps to take.
Preventing Further Damage
Protection from the Elements
After a fire, your home may be left vulnerable to the elements. Open windows, broken doors, and damaged roofs can allow rain, wind, and debris to cause further damage. Securing these openings with tarps, boards, and temporary repairs can prevent additional weather-related destruction.
Avoiding Water Damage
Firefighting efforts often involve large amounts of water, leading to potential water damage. Securing your property helps in managing and mitigating water damage, preventing issues such as mold growth and structural weakening.
Ensuring Safety and Security
Preventing Unauthorized Access
A fire-damaged home can attract unwanted attention from looters and vandals. Securing your property helps prevent unauthorized access and theft. Consider installing temporary fencing, locks, and security cameras to deter intruders.
Reducing Accident Risks
Fire damage can leave your home structurally unsound and hazardous. Securing the property minimizes the risk of accidents for you, your family, and emergency responders. Barricade unsafe areas and post warning signs to keep everyone informed of potential dangers.
Protecting Personal Belongings
Salvaging Valuables
Securing your property allows you to safely recover and protect personal belongings that survived the fire. Items like important documents, family heirlooms, and electronics should be retrieved and stored securely to prevent further damage or loss.
Insurance Claims
A secured property helps in the accurate documentation of damages for insurance claims. It ensures that the scene remains unchanged, allowing insurance adjusters to assess the full extent of the fire damage and process your claim effectively.
Steps to Secure Your Property
Engage Professional Services
Hiring a professional restoration company like SERVPRO® ensures that your property is secured correctly and efficiently. Professionals have the expertise and equipment to handle all aspects of securing and restoring your home.
Board Up Services
Boarding up windows and doors is a common and effective method to secure your property. This prevents unauthorized access and protects the interior from weather damage.
Tarp Over Roofs
If the roof is damaged, tarping over it is essential to prevent water intrusion. This temporary measure helps protect the interior from further damage until permanent repairs can be made.
Conclusion
Securing your property after a fire is a critical step in the recovery process. It prevents additional damage, ensures safety, protects personal belongings, and facilitates insurance claims. Trusting professionals like SERVPRO to secure and restore your home can provide peace of mind and a faster return to normalcy. Taking immediate and appropriate actions after a fire will safeguard your property and aid in a smoother, more efficient recovery.
Post-Flood Safety: Checking Your Home's Structural Integrity
6/12/2024 (Permalink)
Experiencing a flood can be a traumatic event for any homeowner. After the water recedes, one of the first steps you should take is to assess your home's structural integrity. Floodwaters can cause significant damage to the foundation, walls, and other structural components of your home. Here's a guide on how to safely check your home's structural integrity after a flood.
Wait for Water to Recede
Before assessing your home, ensure that the floodwaters have fully receded and the area is safe to enter. Avoid rushing back into your home while there is still standing water or strong currents, as this can be dangerous.
When you enter your home for inspection, wear protective clothing such as rubber boots, gloves, and masks to protect yourself from contaminated water or mold. Be cautious of potential hazards such as unstable structures or electrical issues.
Inspect the Foundation & Interior
Check the foundation of your home for any visible cracks or shifts. Floodwater can cause soil erosion around your foundation, leading to instability. If you notice any significant cracks or uneven settling, contact a professional engineer for further assessment.
Look for signs of damage in your home's walls and floors, such as cracks, warping, or buckling. These can indicate structural issues caused by water infiltration. Pay special attention to load-bearing walls and floors for any signs of structural failure.
Examine the Roof, Attic and Electrical
Inspect your roof and attic for water stains, mold growth, or sagging. Leaks in the roof can lead to water damage throughout your home. If you find any damage, have it repaired as soon as possible to prevent further issues.
Floodwater can damage electrical and plumbing systems, posing risks of fire or electrocution. Check for water-damaged outlets, switches, and wiring. Have a professional electrician inspect your system for safety. Similarly, examine your plumbing for leaks, clogs, or other damage.
Look for Mold and Mildew
Mold and mildew can grow quickly in damp conditions, posing health risks and causing damage to your home. Look for visible signs of mold on walls, ceilings, and floors, as well as musty odors. If you find mold, consider hiring a professional to remove it safely.
Inspect doors and windows for signs of warping, misalignment, or water damage. Properly functioning doors and windows are crucial for structural integrity and energy efficiency.
Inspect the Exterior
Examine the exterior of your home, including siding, trim, and any decks or patios. Look for signs of damage such as peeling paint, loose siding, or erosion around the foundation. If you find any significant damage or are unsure about the extent of the structural issues, consult a professional engineer or contractor for a thorough inspection. They can provide a detailed assessment and recommend necessary repairs.
Take photos and videos of any damage you find for insurance purposes. Documenting the extent of the damage can help with the claims process and ensure you receive appropriate compensation.
Checking your home's structural integrity after a flood is crucial for the safety of you and your family. Take the time to thoroughly inspect your home and address any issues promptly. By doing so, you can protect your home from further damage and ensure a safe living environment.
The Urgency of Swift Action: The Importance of Prompt Storm Damage Cleanup
5/28/2024 (Permalink)
When a storm strikes, its impact can be swift and devastating, leaving behind a trail of destruction in its wake. From fallen trees to flooded properties, the aftermath of a storm can be overwhelming. However, amidst the chaos, one thing is clear: prompt cleanup is crucial. In this blog, we'll delve into the importance of swift action when it comes to storm damage cleanup and the benefits it brings to homeowners and property owners alike.
1. Minimize Further Damage
Time is of the essence when it comes to storm damage cleanup. Left unattended, water intrusion, debris accumulation, and structural damage can worsen, leading to additional problems such as mold growth, rot, and compromised structural integrity. Prompt cleanup efforts can help mitigate these risks and prevent further damage to your property.
2. Ensure Safety and Security
Storm-damaged properties can pose significant safety hazards, from unstable structures to exposed electrical wires. Prompt cleanup helps address these safety concerns, reducing the risk of accidents and injuries for occupants and restoration professionals alike. Additionally, timely cleanup efforts can help secure the property against intruders and prevent theft or vandalism.
3. Expedite the Restoration Process
The longer storm damage is left unresolved, the more extensive and costly the restoration process becomes. By acting swiftly, property owners can expedite the restoration timeline and minimize downtime. Prompt cleanup allows restoration professionals to assess the damage, develop a comprehensive restoration plan, and begin repairs without delay, helping restore the property to its pre-storm condition as quickly as possible.
4. Preserve Personal Belongings
Storm damage can wreak havoc on personal belongings, from furniture and electronics to sentimental items. Quick action can help salvage and preserve these possessions, reducing the emotional and financial toll of loss. Restoration professionals employ specialized techniques and equipment to salvage water-damaged items, restoring them to their preloss condition whenever possible.
5. Protect Health and Well-being
Storm damage can create an environment ripe for mold growth, bacteria, and other harmful contaminants. Prompt cleanup helps mitigate these health risks by removing water, debris, and contaminants from the property. This not only protects the health and well-being of occupants but also ensures a safer working environment for restoration crews.
When it comes to storm damage cleanup, time is of the essence. Prompt action can mean the difference between a minor inconvenience and a major catastrophe. By acting swiftly to address storm damage, property owners can minimize further damage, ensure safety and security, expedite the restoration process, preserve personal belongings, and protect the health and well-being of all involved. Don't wait—take action today to mitigate the impact of storm damage and restore your property to its former glory.
Understanding the Persistence of Mold: Why Does It Keep Coming Back?
5/23/2024 (Permalink)
 Explore the common reasons why mold persists and provide insights into how to address them effectively
Dealing with recurring mold issues in your home can be frustrating and concerning. Despite your efforts to remove it, mold seems to return time and time again. Understanding why mold keeps coming back is crucial for implementing effective long-term solutions to prevent its recurrence. In this blog post, we'll explore the common reasons why mold persists and provide insights into how to address them effectively.
Identifying the Root Causes of Recurring Mold:
One of the primary reasons mold keeps coming back is due to ongoing moisture intrusion in your home. Whether it's from leaks in plumbing fixtures, roof leaks, or poor ventilation, excess moisture creates the perfect environment for mold to thrive. Without addressing the underlying moisture issue, mold will continue to return despite repeated cleaning efforts.
Inadequate Cleaning Techniques
Superficial Cleaning:
Simply wiping away visible mold growth without addressing underlying spores and moisture is unlikely to eliminate the problem permanently. Mold often extends beyond the visible surface, penetrating porous materials and hiding in hard-to-reach areas. Without thorough cleaning and disinfection, mold can quickly regrow and spread.
Improper Ventilation:
Inadequate ventilation in your home can contribute to moisture buildup and create conditions favorable for mold growth. Areas such as bathrooms, kitchens, and basements are particularly prone to mold due to poor airflow and high humidity levels. Proper ventilation, including the use of exhaust fans and opening windows, is essential for reducing moisture and preventing mold recurrence.
Insufficient Remediation Efforts
DIY Remediation:
Attempting to remove mold on your own without the necessary expertise and equipment can result in incomplete remediation. Without proper containment, cleaning, and drying techniques, mold spores can spread to unaffected areas and continue to multiply. Professional mold remediation services, like those offered by SERVPRO®, are essential for thorough and effective mold removal.
Failure to Address Underlying Issues:
Successful mold remediation involves more than just cleaning visible mold growth. It also requires addressing underlying issues such as moisture intrusion, water damage, and poor ventilation. Failure to identify and rectify these issues can result in mold returning, even after remediation efforts.
Preventing Mold Recurrence:
Address Underlying Moisture Issues:
Identify and address sources of moisture intrusion in your home, such as leaks in plumbing fixtures, roof leaks, or condensation. Repairing leaks, improving ventilation, and using dehumidifiers can help keep moisture levels in check and prevent mold growth.
Maintain Regular Cleaning and Maintenance:
Regularly inspect your home for signs of mold and address any issues promptly. Clean and disinfect areas prone to moisture buildup, such as bathrooms, kitchens, and basements, to prevent mold from taking hold.
The persistence of mold can be attributed to underlying moisture issues, inadequate cleaning techniques, and insufficient remediation efforts. By addressing these root causes and implementing preventive measures, you can effectively prevent mold from coming back and maintain a healthy indoor environment. If you're dealing with recurring mold issues in your home, consider seeking professional assistance from a restoration company like SERVPRO for thorough mold remediation and prevention.
The Urgency of Swift Action: The Importance of Prompt Storm Damage Cleanup
5/2/2024 (Permalink)
When a storm strikes, its impact can be swift and devastating, leaving behind a trail of destruction in its wake. From fallen trees to flooded properties, the aftermath of a storm can be overwhelming. However, amidst the chaos, one thing is clear: prompt cleanup is crucial. In this blog, we'll delve into the importance of swift action when it comes to storm damage cleanup and the benefits it brings to homeowners and property owners alike.
1. Minimize Further Damage
Time is of the essence when it comes to storm damage cleanup. Left unattended, water intrusion, debris accumulation, and structural damage can worsen, leading to additional problems such as mold growth, rot, and compromised structural integrity. Prompt cleanup efforts can help mitigate these risks and prevent further damage to your property.
2. Ensure Safety and Security
Storm-damaged properties can pose significant safety hazards, from unstable structures to exposed electrical wires. Prompt cleanup helps address these safety concerns, reducing the risk of accidents and injuries for occupants and restoration professionals alike. Additionally, timely cleanup efforts can help secure the property against intruders and prevent theft or vandalism.
3. Expedite the Restoration Process
The longer storm damage is left unresolved, the more extensive and costly the restoration process becomes. By acting swiftly, property owners can expedite the restoration timeline and minimize downtime. Prompt cleanup allows restoration professionals to assess the damage, develop a comprehensive restoration plan, and begin repairs without delay, helping restore the property to its pre-storm condition as quickly as possible.
4. Preserve Personal Belongings
Storm damage can wreak havoc on personal belongings, from furniture and electronics to sentimental items. Quick action can help salvage and preserve these possessions, reducing the emotional and financial toll of loss. Restoration professionals employ specialized techniques and equipment to salvage water-damaged items, restoring them to their preloss condition whenever possible.
5. Protect Health and Well-being
Storm damage can create an environment ripe for mold growth, bacteria, and other harmful contaminants. Prompt cleanup helps mitigate these health risks by removing water, debris, and contaminants from the property. This not only protects the health and well-being of occupants but also ensures a safer working environment for restoration crews.
When it comes to storm damage cleanup, time is of the essence. Prompt action can mean the difference between a minor inconvenience and a major catastrophe. By acting swiftly to address storm damage, property owners can minimize further damage, ensure safety and security, expedite the restoration process, preserve personal belongings, and protect the health and well-being of all involved. Don't wait—take action today to mitigate the impact of storm damage and restore your property to its former glory.
 24/7 Emergency Service